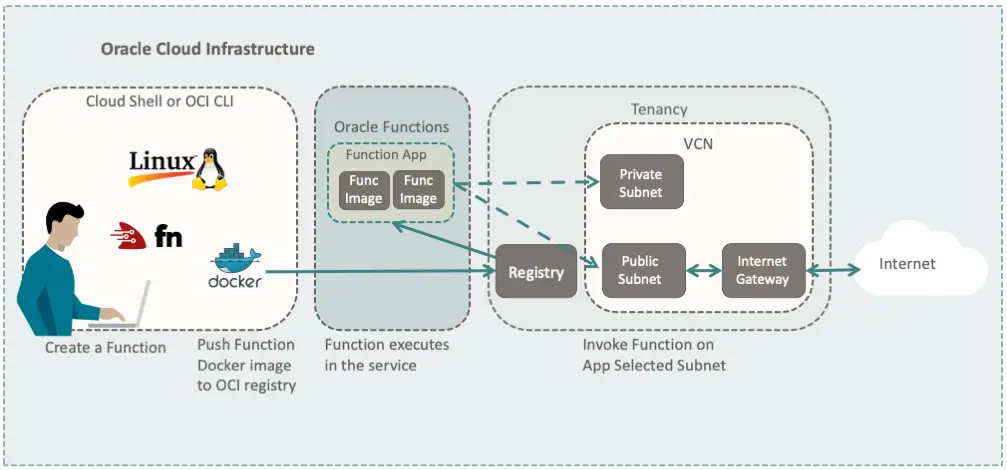
The OCI Function service allows you to run code on an infrastructure that you don’t have to manage, in a scalable and automated way.
This concept is called “serverless” because the end user will no longer have to worry about managing any infrastructure to run his own code.
OCI implements what is the FN open source project, the project has been integrated with Oracle cloud services and is based on the execution of code inside a container, therefore it can potentially support any programming language and any type of container on x86 architecture, moreover, it is not strictly linked with the Oracle infrastructure and you can easily switch between different FN environments.
To create a function I advise you to read the official page of the service and to follow the quick start in my case I preferred to follow the deployment from my computer which is also my usual development environment but it is possible to do the same from the OCI cloud shell with much shorter times since it will be performed in a data center with very high network performance.
The example of this function is based on Python, the basic OCI credentials have already been created, if you need a specific guide I suggest you look in the Developer Guide or in the OCI Getting started
The commands to configure the local FN environment are as follows:
fn create context <my-context> --provider oracle
fn use context <my-context>
fn update context oracle.profile <profile-name>
fn update context oracle.compartment-id <compartment-ocid>
fn update context api-url <api-endpoint>
fn update context registry <region-key>.ocir.io/<tenancy-namespace>/<repo-name-prefix>
docker login -u '<tenancy-namespace>/<user-name>' <region-key>.ocir.io
With these commands, we have instructed FN to use the OCI cloud and set up an OCI repository to save the container used by FN to run our code
In the same way, let’s go on to create the Function application on the OCI side:
fn create app pythonexamples --annotation oracle.com/oci/subnetIds='["<sunbet-ocid>"]'
As you can see the command is not from the OCI CLI but we continue to use FN, if we want we can use the native OCI command to create the application but given the total compatibility of the open-source project we can also use the native one.
Next, we will create a skeleton of the application files for FN locally specifying the programming language, in our case Python:
fn init --runtime python helloworld
Files will be created inside a new directory
the func.py file will contain the executed code and its related requirements.txt file for the dependencies while the func.yaml file is the FN configuration file.
Specifically, the example code is a “Hello world” that you can view here
The next step preparatory to the execution of the function is that of build and deploy, where from the CLI the fn command will orchestrate the build of the container, its release on the OCI repository, and its configuration on OCI Functions.
fn -v deploy --app hello
At the end of the command if everything went well it will be possible to execute the function remotely on the OCI as in this example:
echo -n '{"name": "Oracle"}' | fn invoke pythonexamples hello
in this example, we pass a parameter to the function that will be executed and it will read it from the remote function, if enabled it will be possible to view the output generated by the function in the OCI logging service.
In this article we have seen a simple example of functions and how to use them, it is also possible to execute a function through other OCI services with specific events or use the functions as an API service, use other languages than Python or other versions of containers.
For more examples of functions on OCI in Python I recommend this repository or my support repository for these articles at this link
